|
|
|
|
|
 |
Adding Shared Borders and Navigation BarsFor the Millennium Celebration Web, you will let FrontPage manage the hyperlinks that site visitors will click to move around the pages in your web. FrontPage achieves this with a combination of two powerful features: shared borders and automatic navigation bars. Shared borders are page regions reserved for content that you want to appear consistently throughout the pages in your web. These borders can contain page banners and navigation bars. Page banners display the page title you gave each page when you created or saved it. Navigation bars are a row or column of hyperlinks to the other pages in the current web. FrontPage can automatically update shared borders and navigation bars, so the navigation structure of your web will always work correctly, even when you add, move, or delete pages from the web's structure. In Lesson 1, you already completed the first step required for automatic navigation bars: creating the basic web structure in Navigation view. Because you have already done this, you'll now enable shared borders throughout your web.
FrontPage displays the Shared Borders dialog box. Here, you can specify where on your pages FrontPage should insert shared borders. Because your web structure has two levels of pages — the home page and the pages below it — you will use two kinds of shared borders and two kinds of navigation bars. FrontPage creates shared borders and default navigation bars for all the pages in the current web. You'll see what these look like when you return to Page view. Next, you'll customize the appearance of the default navigation bars. Because they are shared across all pages in the current web, you can change their properties on any page and the change will be reflected across the entire web.
Note the changes FrontPage has made to the home page. It now contains a top and left shared border. The top border contains a page banner with the name of the current page, and the left border contains a list of navigational hyperlinks that look exactly like the ones you manually created at the beginning of this lesson. In Page view, you can easily test hyperlinks that point to pages and files in your web.
FrontPage opens the page the hyperlink points to. On the Background page that is now open, shared borders and navigation bars have also been inserted. On this page, however, the links to the other pages are displayed in the top border, just under the page banner. This is because FrontPage uses the web structure you created in Navigation view to determine the level the current page is on. By default, the top shared border points to pages on the same level as the current one, whereas the left border points to pages below the current one. In the next section, we'll change this default to another design.
FrontPage brings the home page back into view.
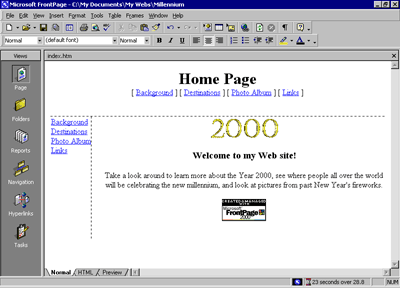
Double-clicking a navigation bar opens the Navigation Bar Properties dialog box. Here, you can customize the appearance of a navigation bar and the hyperlinks it creates. Currently, the horizontal navigation bar is set to link to pages on the same level. Since the home page is on its own level in your navigation structure of your web, there are no other pages on the same level. FrontPage therefore doesn't show any navigation bars in this shared border. For the Millennium Celebration Web, we want to have a horizontal navigation bar on the home page and vertical navigation bars on the other pages. To do this, we'll change the default setup of both navigation bars. You can make these changes on the current page and they'll be reflected throughout your web. FrontPage creates a navigation bar with hyperlinks to all the pages below the home page level. Your page should now look like this:
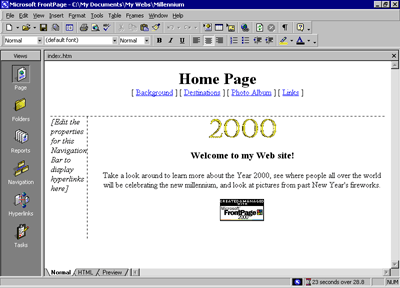
Note that the left navigation bar still contains the same set of hyperlinks as the top navigation bar. In the next steps, you'll remove the obvious redundancy, and format the left navigation bar so it is displayed only on the other pages that the home page points to. FrontPage changes the navigation bar to the placeholder text that reads "Edit the properties for this Navigation Bar to display hyperlinks here." This text is only shown in Page view while you work; it will not appear in a Web browser. By pointing the hyperlinks in this navigation bar to the same level as the home page, you are effectively removing the hyperlinks from the left border, because there are no pages on the same level as the home page. This also removes the redundancy between the horizontal and vertical navigation bars. Your page should now look like this:
FrontPage brings the Background page back into view. Note that the changes you've made on the home page to both the horizontal and vertical navigation bars are automatically reflected here, as well as on all the other pages in your web.
|
 |
|
|||
| Last Updated April 1999
©1999 Microsoft Corporation. All rights reserved. Terms of Use. |
|||